Prerequisites
- Scenario scene is in File → Build Settings (and/or Addressables, if you load by reference).
- RuntimeManager prefab variant matches your needs (offline vs session, tour if applicable).
- Scenario Data Config exists on Global Settings.
1. Create simulation scenario data
- Project window → Create → MolcaSDK → Scenario → Simulation Scenario Data (or equivalent menu for
SimulationScenarioData). - Name the asset (e.g.
Scenario_MyTraining). - In the Inspector, set:
- Ref Id — stable id (auto-generated if empty).
- Scenario name / description / tags / image — Home UI and metadata (
DynamicLocalizationentries are initialized fromRefIdinBaseScenarioData.Initialize()). - Time limit —
Time Limit Seconds;0= no limit.
- Scenario Activities — add
ScenarioActivityDataentries (each has Ref Id, titles, Activity Id / slug fields as defined on the type). These are the authoring records the runtime ScenarioActivity will match. - Scene loading — configure the
SceneLoadPlanfor your scenario:- Single Player Plan — expand
Single Player Planin the Inspector:- Scenario Scene — the main scenario logic scene (required). Set either
Scene Name(build settings) orScene Reference(Addressable — takes priority). - Preload Scenes — optional scenes loaded before the scenario scene (e.g., shared environment). Index 0 loads as Single (active scene); subsequent entries load Additive. Each entry can specify
Wait For Ref Idsto pause loading until those RefIds are registered inReferenceManager.
- Scenario Scene — the main scenario logic scene (required). Set either
- Role Scene Mappings — for multiplayer scenarios, configure per-role scene plans. Each mapping has a
Role Id(matching aScenarioRole.RefId) and its ownSceneLoadPlan.
- Single Player Plan — expand
preloadScenes[0] loads as Single, subsequent preloads as Additive (waiting for RefIds between each), then scenarioScene as Additive. When no preloads, scenarioScene loads as Single.
Confirm the scene names or Addressable keys match your Unity scenes exactly.
2. Create and lay out the scenario scene
- Create or open the Unity scene referenced by the scenario asset.
- Add the
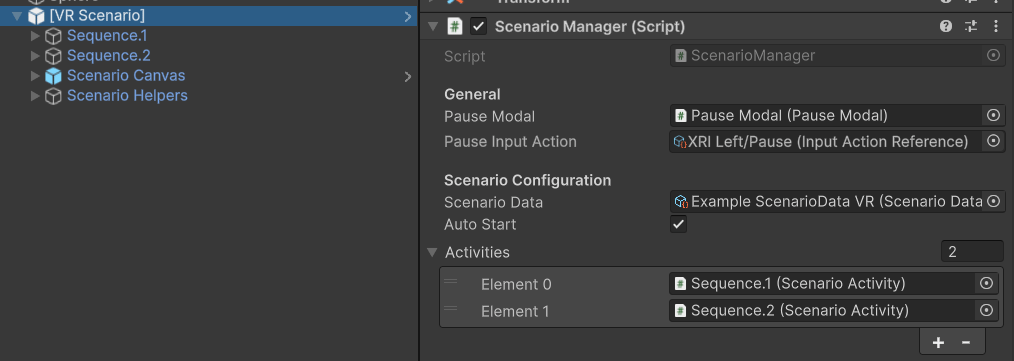
[VR Scenario]prefab (typical path:Assets/_MolcaSDK/_VR/Prefabs/Base/) — includes XR rig, scenario UI shell, and related objects (your project layout may vary). - Select
ScenarioManageron the prefab (or your scene root).
ScenarioManager (in scene)
See Scenario manager for state and timing notes.
3. Create activities in the scene
For eachScenarioActivityData on the asset:
- Create a GameObject (e.g. under an
Activitiesparent). - Add
ScenarioActivity— Unity addsSequenceControllerautomatically ([RequireComponent]). - Set
Activity IdonScenarioActivityto the same string as that row’sScenarioActivityData.RefId. At runtime, the component resolvesActivityDatawithFirstOrDefault(a => a.RefId == activityId); a mismatch logs a warning and breaks Home/session metadata binding. - Configure
autoAdvanceToNextif you want automatic progression to the next activity when the sequence completes. - Drag each activity GameObject into
ScenarioManager.Activitiesin the intended order (unless you rely entirely on simultaneous start — then order still matters for UI/progression).
4. Add steps under each activity
- Under each activity object, add child GameObjects and attach Step components (Grab, Valve, etc.).
SequenceControllerdiscovers Step children and runs them in hierarchy order; use ParallelStep or bridges when you need non-linear flow.- Wire SceneObjectReference / interactables: put ReferenceableComponent on targets and point steps at those Ref Ids.
- Optional: Auxiliaries on each step (scoring, haptics, controller hints — VR step auxiliaries).
5. Scoring (optional)
ScenarioScoringon theScenarioManagerobject (or as your prefab dictates).ActivityScoringperScenarioActivity.StepScoringAuxiliaryon steps that contribute points.
6. Register in ScenarioDataConfig
- Open the
ScenarioDataConfigSettingModule. - Under Scenario Collections, add or extend a collection.
- Add your
SimulationScenarioDataasset to the list so Home UI can list it (and so org/content flows can resolve it when connected).
7. Test
Scene loading details
SceneLoadPlan structure
TheSceneLoadPlan supports ordered multi-scene loading with synchronization:
SceneEntry fields
Each scene entry (preload or scenario) has:Load order example
Configuration:- Load “Environment_Factory” as Single (active scene)
- Wait for “factory_floor” and “control_panel” RefIds (or 15s timeout)
- Load “Lighting_Day” as Additive
- Wait two frames (no RefIds specified)
- Load “Scenario_SafetyTraining” as Additive
Multiplayer role scenes
For multiplayer scenarios, configureroleSceneMappings:
ScenarioData.GetSceneLoadPlan(playerMode, roleId) returns the appropriate plan. The SceneLoadPlanExecutor (used by ScenarioSessionManager) handles the ordered loading and RefId synchronization.
Tour variant (short path)
- Create
TourScenarioData(Create → MolcaSDK → Scenario → Tour Scenario Data). - Fill metadata, spots, materials, and scene reference like the simulation asset.
- Open the tour scene; use
[VR Tour]fromAssets/_MolcaSDK/_VR/Prefabs/Tour/or[VR Scenario]withTourScenarioDataassigned — mode driver selects tour behavior. - Place
TourAreaManager,TourSpotController, etc., per your content (Tour area and spots). - Runtime prefab must include
TourSubsystemwhen using tour + session flows. - Register the asset in ScenarioDataConfig as above.
Unity Editor
Scenario data asset and in-scene wiring