
Assets/_MolcaSDK/_VR/Scripts/Scenario/Steps/GrabStep.cs— Step that validates grab completionAssets/_MolcaSDK/_VR/Scripts/Scenario/Steps/Auxiliary/StepObjectHighlightAuxiliary.cs— Highlights objects while step is activeAssets/_MolcaSDK/_VR/Scripts/Scenario/Listener/StepDirectionBeltController.cs— Controls direction belt visual guidance
When to use
Interactable Object — use this guide when implementing this interaction pattern in a VR training scenario.Role
This guide covers implementing a grabbable object in VR training scenarios with complete visual feedback:- XRGrabInteractable — Core grab mechanics from XR Interaction Toolkit
- Object Highlight — Visual feedback via
StepObjectHighlightAuxiliary(material overlay) - Direction Belt — Animated guide via
StepDirectionBeltController(reference-based targeting) - GrabStep — Step completion validation and grab rules
Setup Steps
1. Create Grabbable Object with XRGrabInteractable
- Create or select your grabbable object GameObject
- Add
XRGrabInteractablecomponent (from XR Interaction Toolkit) - Configure in Inspector:
- Select Mode:
Singlefor one-hand grab - Movement Type:
Instantaneous,Kinematic, orVelocityTracking(depending on physics) - Throw on Detach: Enable if object should move after release
- Smooth Position/Rotation: Adjust for grabbing feel
- Select Mode:
GameObject with XRGrabInteractable configured for grab mechanics.
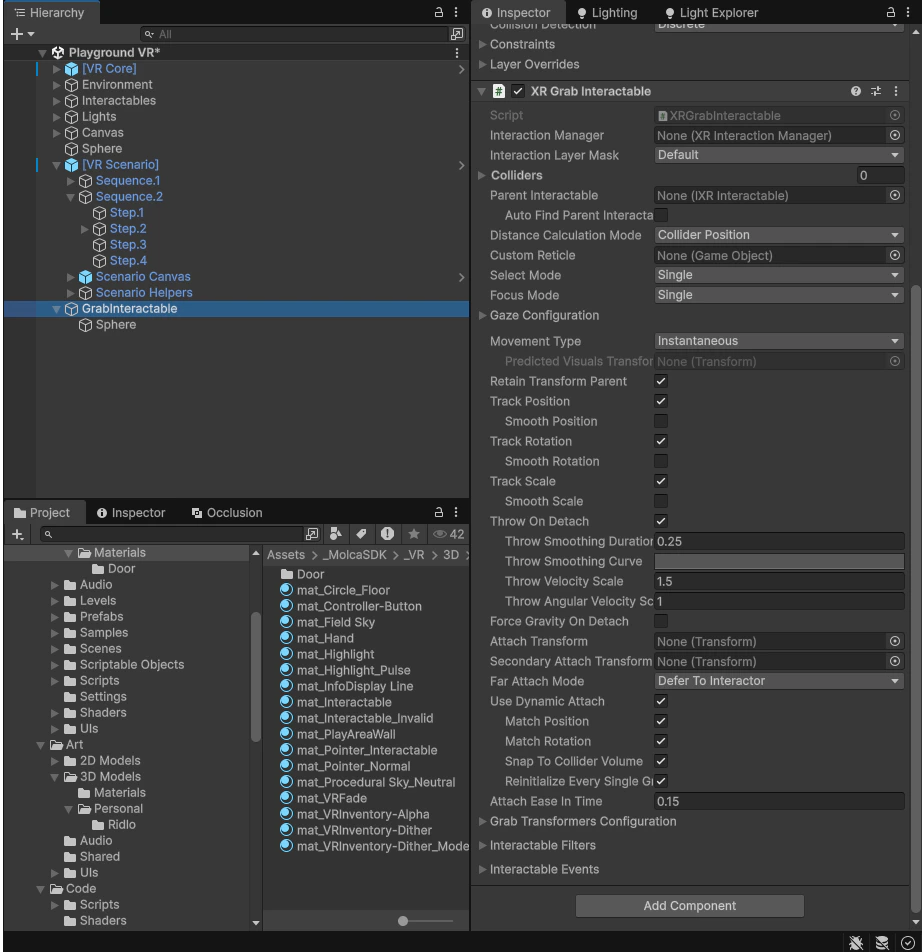
XRGrabInteractable Setup
2. Add GrabStep for Completion Validation
- Add
GrabStepcomponent to the grabbable object (same GameObject as XRGrabInteractable) - Configure in Inspector:
- Grab Interactable: Auto-found or manually assign the
XRGrabInteractable - Auto Find Interactable: Check to auto-discover on same object
- Complete On Grab: Enable if step should complete immediately on grab
- Require Hold Duration: Enable with
minGrabDuration(in seconds) for timed grabs - Allow Any Interactor: Check to allow any hand, or assign Required Interactor (left/right)
- Grab Interactable: Auto-found or manually assign the
3. Add StepObjectHighlightAuxiliary for Visual Feedback
- On the GrabStep component, expand Auxiliaries section
- Click Add Auxiliary → VR/Object Highlight
- Configure StepObjectHighlightAuxiliary:
- Targets: Drag the grabbable object (or objects) to highlight
- Highlight Material: Assign an emissive or outline material (acts as overlay or rim light)
- Use Mat Swap Mode (new): Enable for material-swap-only approach (recommended for performance)
- Deactivate Original Renderers: Check to hide original while highlight shows (copy mode only)
- Copy Child Meshes: Check to include child objects in highlight (copy mode only)
Highlight Modes
StepObjectHighlightAuxiliary supports two distinct approaches:useMatSwapMode = true) for most grab interactions. Enable Copy Mode only if your highlight material requires the original geometry preserved (rare).
GrabStep Inspector with StepObjectHighlightAuxiliary showing both Copy Mode and Material Swap Mode options.
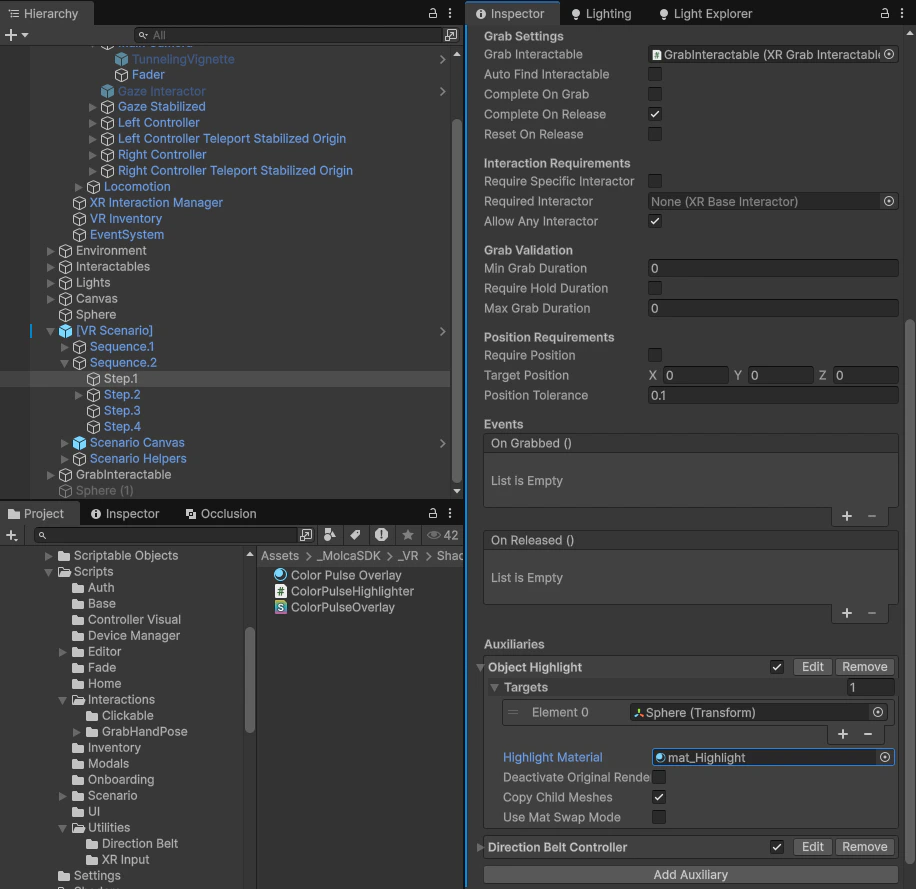
StepObjectHighlightAuxiliary: Copy Mode vs Material Swap Mode
- Copy Mode: Emissive shader with
_EmissionIntensityor_Colorcontrol; outline shader (e.g., Quick Outline) - Material Swap Mode: Rim light shader with pulse animation (e.g.,
mat_Highlight_Pulse); automatically copies texture properties from original (_BaseMap, _BumpMap, _Metallic, etc.)
Material Swap Mode: highlight material with rim light glow and pulse animation applied to grabbable object.
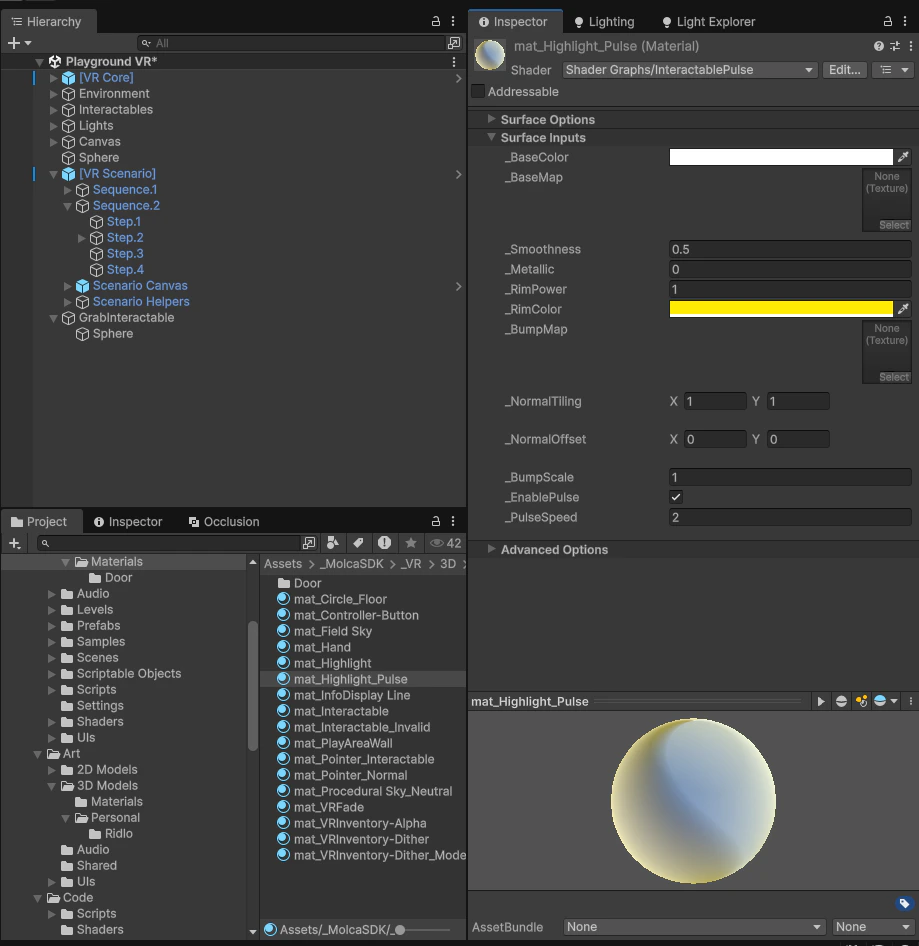
Material Swap Mode - Rim Light Pulse Effect
4. Add StepDirectionBeltController for Grab Guidance
- On the GrabStep component, in Auxiliaries section
- Click Add Auxiliary → VR/Scenario/Direction Belt Controller
- Configure StepDirectionBeltController:
- Direction Belt Ref: Assign the DirectionBelt’s ReferenceableComponent (scene must have one)
- Target Ref: Assign the target grab point’s ReferenceableComponent
- Use Target Position: Check to use fixed position instead of transform
- Target Position: Set X/Y/Z coordinates if using position mode
- Clear On End: Check to clear belt when step completes
- Auto Complete On Target Set: Leave unchecked (GrabStep handles completion)
directionBeltRef and targetRef require ReferenceableComponent:
- Add ReferenceableComponent to DirectionBelt GameObject (auto-generates stable ID via
OnValidate) - Add ReferenceableComponent to target grab point GameObject
- The reference system resolves these async on step start
GrabStep Inspector with StepDirectionBeltController auxiliary showing Direction Belt Ref and Target Ref assignments.
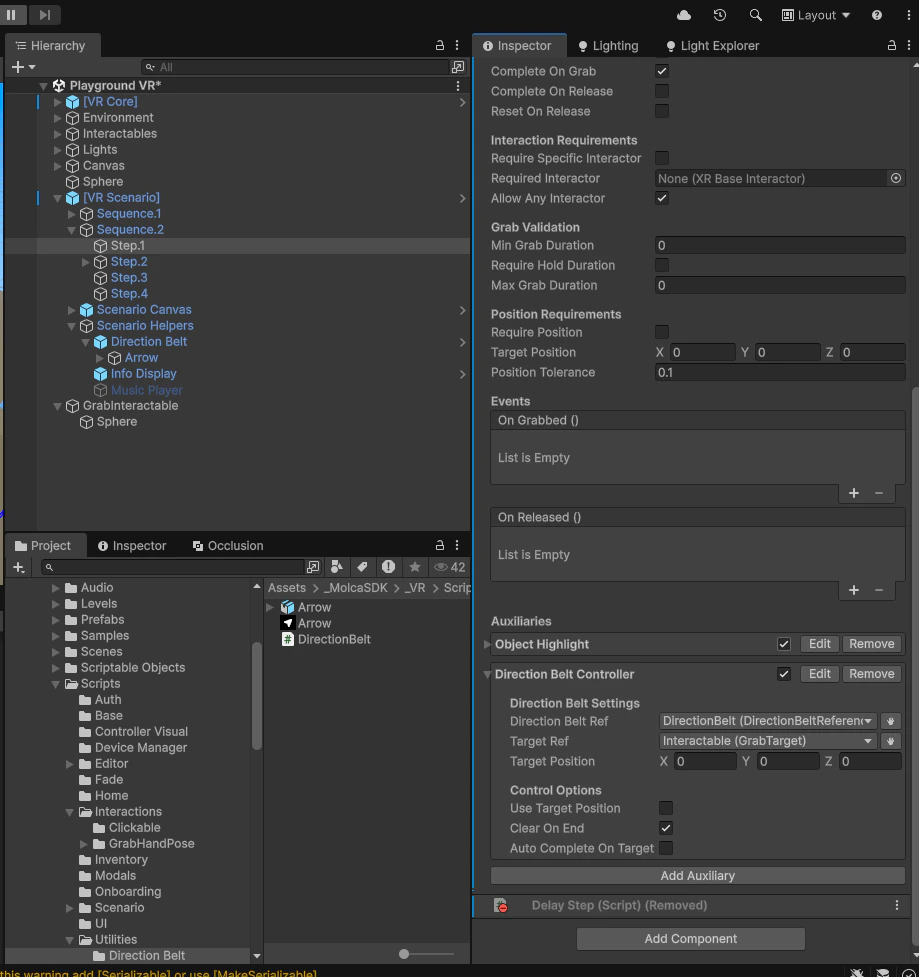
StepDirectionBeltController in GrabStep
DirectionBelt GameObject showing ReferenceableComponent with auto-generated ID visible in Inspector.
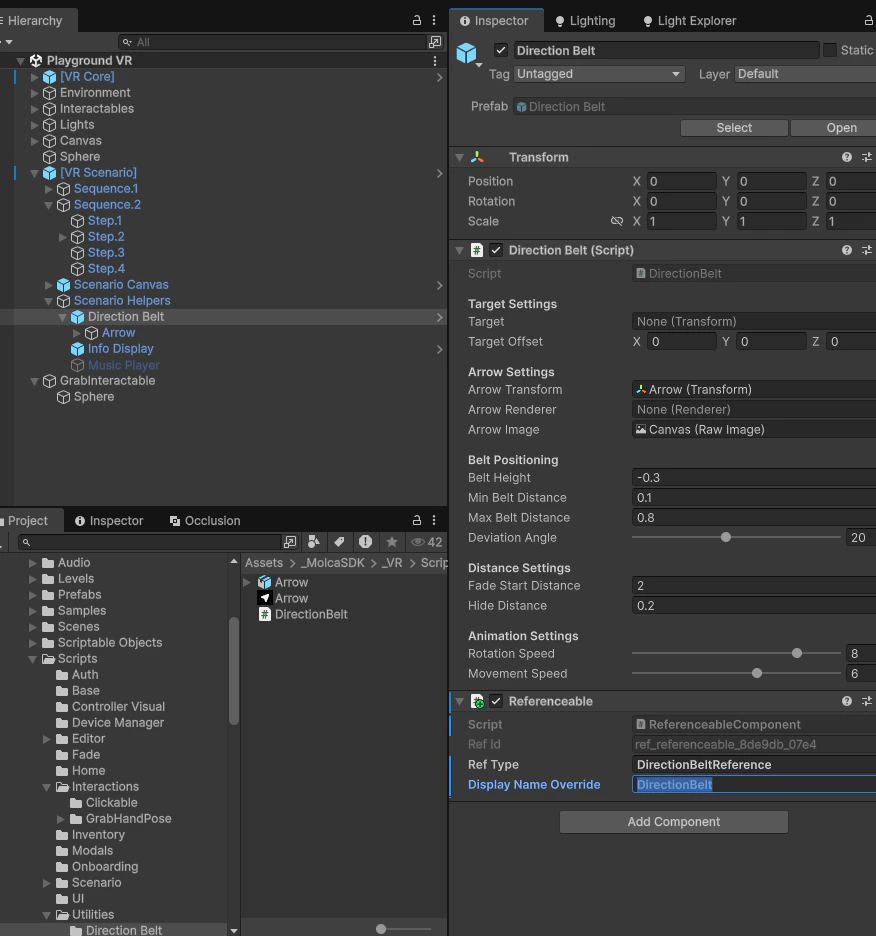
DirectionBelt with ReferenceableComponent
How It Works
StepObjectHighlightAuxiliary
File:Assets/_MolcaSDK/_VR/Scripts/Scenario/Steps/Auxiliary/StepObjectHighlightAuxiliary.cs
Highlights target objects using one of two performance-optimized approaches:
Copy Mode (Default)
- On step start (
OnStepBegin): Creates visual copy of target objects - Material application: Copies all renderers to highlight duplicates with highlight material applied
- Original renderers: Optionally deactivates originals (if Deactivate Original Renderers enabled)
- On step end: Destroys highlight copies and restores originals
- Cleanup:
VisualCopyUtility.RestoreRenderers()re-enables deactivated renderers
targets[]— Objects to highlight (can be multiple)highlightMaterial— Material overlay (emissive/outline shader)deactivateOriginalRenderers— Hide originals during highlightcopyChildMeshes— Include child meshes in the visual copy
Material Swap Mode (Recommended) ⭐
- On step start (
OnStepBegin): Swaps renderers directly to highlight material - Property copying: Automatically copies texture & material properties from original to highlight via
MaterialPropertyBlock:- Textures:
_BaseMap,_BumpMap,_MetallicGlossMap,_OcclusionMap,_DetailAlbedoMap,_DetailNormalMap,_EmissionMap - UV Scale/Offset:
_BaseMap_ST,_BumpMap_ST,_MetallicGlossMap_ST - Colors:
_BaseColor,_Color,_EmissionColor - Floats:
_Metallic,_Smoothness,_OcclusionStrength,_BumpScale
- Textures:
- PropertyBlock pooling: Uses
MaterialPropertyBlockPoolto reuse blocks (zero GC allocation after warmup) - On step end: Restores original materials and returns pooled blocks
targets[]— Objects to highlight (can be multiple)highlightMaterial— Rim light material with pulse animation (e.g.,mat_Highlight_Pulse)useMatSwapMode— Enable this toggle to activate material swap mode
StepDirectionBeltController
File:Assets/_MolcaSDK/_VR/Scripts/Scenario/Listener/StepDirectionBeltController.cs
Controls a DirectionBelt component to guide grab approach:
- On step start (
OnStepBegin): Resolves DirectionBelt and target references - Sets target: Via
DirectionBelt.SetTarget(transform)orSetTargetPosition(vector3) - Belt animation: DirectionBelt handles visual animation (arrows, rotation, etc.)
- On step end: Clears target if Clear On End enabled
directionBeltRef— Reference to DirectionBelt ReferenceableComponenttargetRef— Reference to grab point ReferenceableComponentuseTargetPosition— Use fixed position instead of transformtargetPosition— X/Y/Z position (if using position mode)clearOnEnd— Clear belt when step completesautoCompleteOnTargetSet— Auto-complete step (usually disabled)
- Must have ReferenceableComponent for reference system
- Handles its own animations and visuals
- Scene must have DirectionBelt active (or fallback auto-find applies)
MaterialPropertyBlockPool (Material Swap Mode Support)
File:Packages/com.molca.core/Runtime/Utilities/MaterialPropertyBlockPool.cs
When Material Swap Mode is enabled, StepObjectHighlightAuxiliary uses a lightweight object pool to reuse MaterialPropertyBlock instances across highlight operations. This eliminates GC allocation overhead during frequent highlighting.
Pool Behavior:
- Get() — Returns cached block or creates new (up to 100 max)
- Return() — Puts block back in pool for reuse
- Warmup() — Pre-allocates 10 blocks during initialization
- GetStats() — Returns pool diagnostics (active, pooled, total)
- Clear() — Empties pool on shutdown
- Initial (no warmup): ~100 bytes allocation per highlight
- After warmup: ~0 bytes allocation (blocks reused)
- Net improvement: ~90% GC reduction in highlight-heavy scenes
MaterialPoolInitializer subsystem during app bootstrap. No additional configuration needed.
Expected Results & Interaction Flow
Idle State
Step is not active. Object appears in its base state (no highlight, no direction belt). The trainee sees a normal scene object with no visual cues.Step Activated (Initial)
When GrabStep becomes active (e.g., sequence step begins):- Object Highlight overlay appears immediately on target object (bright or glowing based on highlight material)
- Direction Belt becomes visible, showing animated guidance toward grab point
- Visual feedback signals “this object is interactive”
Approaching (Hand Near)
As trainee hand approaches within grab range:- Direction Belt continues guiding toward target (arrows, rings, or belt rotation)
- Object Highlight remains visible and locked (confirming grab point)
- Visual feedback is consistent and strong
Grabbable (In Range & Ready)
Hand is within grab range and all GrabStep conditions are met:- Both Object Highlight and Direction Belt remain active
- Highlight material shows full intensity
- Visual feedback indicates “you can grab now”
Grabbing (Grip Active)
Trainee presses grip trigger/button:- Object Highlight remains locked in active state
- Direction Belt may pulse or animate (design-dependent)
- Grab is active; if hold duration required, feedback stays until timer done
Step Complete
Grab completion conditions met (grab + hold time satisfied):- Object Highlight fades out (if original renderers deactivated, they restore)
- Direction Belt clears (if Clear On End enabled)
- Step fires
OnStepEndevent - Visual feedback returns to idle
Implementation (Inspector Only)
For basic grab with visual feedback, no code required. Configure entirely in Inspector:- XRGrabInteractable — Grab mechanics
- GrabStep — Completion validation
- StepObjectHighlightAuxiliary — Visual feedback (material overlay)
- StepDirectionBeltController — Grab guidance (belt animation)
Troubleshooting
Material Swap Mode Setup Guide
When using Material Swap Mode for optimal performance:Step 1: Create or Assign Highlight Material
Use a rim light material with pulse animation:- Recommended:
Assets/_MolcaSDK/_VR/3D/Materials/mat_Highlight_Pulse.mat - Shader:
InteractablePulse.shadergraph(URP Lit base with rim light + pulse nodes) - Properties:
_EnablePulse— Toggle pulse on/off_PulseSpeed— Breathing rate (default: 2.0)_RimColor— Glow color (default: cyan)
Step 2: Configure StepObjectHighlightAuxiliary
- Enable Use Mat Swap Mode toggle
- Leave Deactivate Original Renderers unchecked (not needed for swap mode)
- Leave Copy Child Meshes unchecked (swap mode handles all renderers automatically)
- Assign your highlight material to Highlight Material field
Step 3: Verify Texture Property Copying
Material Swap Mode automatically copies these from original to highlight:- ✅ Base texture (_BaseMap / _MainTexture)
- ✅ Normal map (_BumpMap / _NormalMap)
- ✅ Metallic/Gloss map (_MetallicGlossMap)
- ✅ UV scale/offset (_BaseMap_ST, etc.)
- ✅ Roughness, metallic, smoothness values
- ✅ Custom colors (_BaseColor, _EmissionColor)
Material Swap Mode: Inspector showing useMatSwapMode enabled with rim light highlight material assigned.
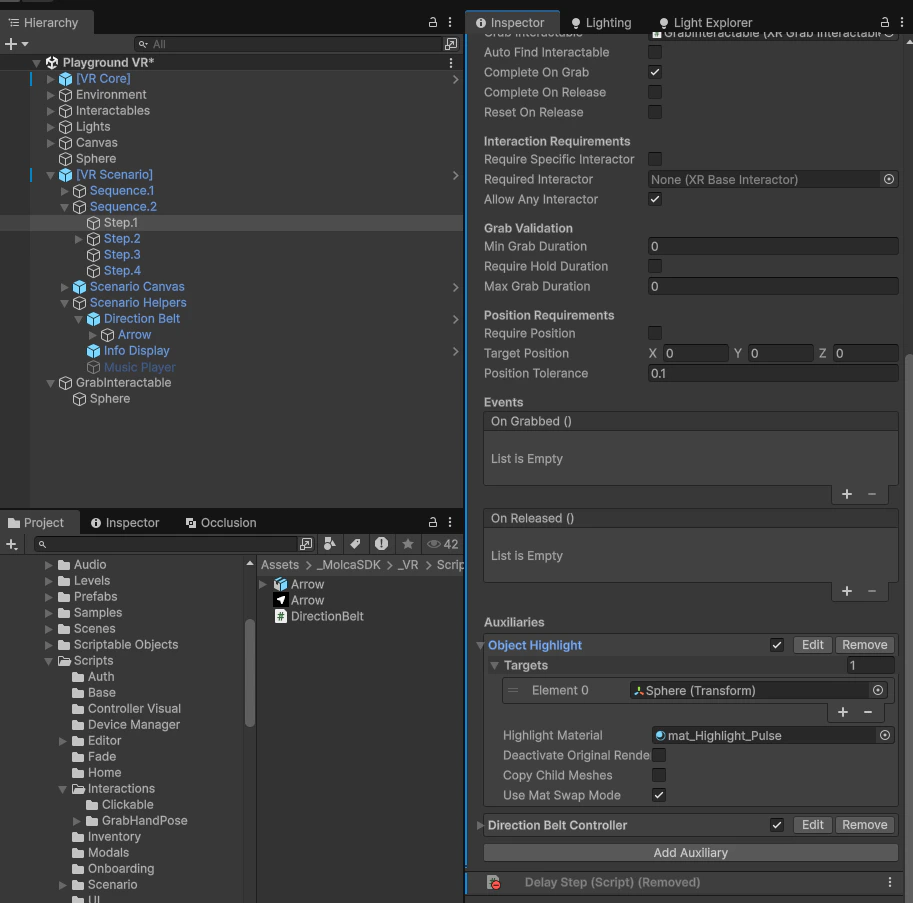
StepObjectHighlightAuxiliary - Material Swap Mode Configuration
Related
- GrabStep — Completion rules, hold duration, and position validation
- StepObjectHighlightAuxiliary — Material overlay highlight feedback (copy & swap modes)
- InteractablePulse Shader — Rim light with pulse animation
- MaterialPropertyBlockPool — Object pool for material properties (GC optimization)
- StepDirectionBeltController — Direction belt animation and targeting
- VR step auxiliaries — Overview of all StepAuxiliary types (haptics, scoring, mode events)
- Step scoring auxiliary — Grab timing and accuracy scoring
- VR player manager — Disable locomotion during precision grabs
Visual Examples
Scene Setup
Scene view showing grabbable object with XRGrabInteractable, GrabStep, and both auxiliaries wired.
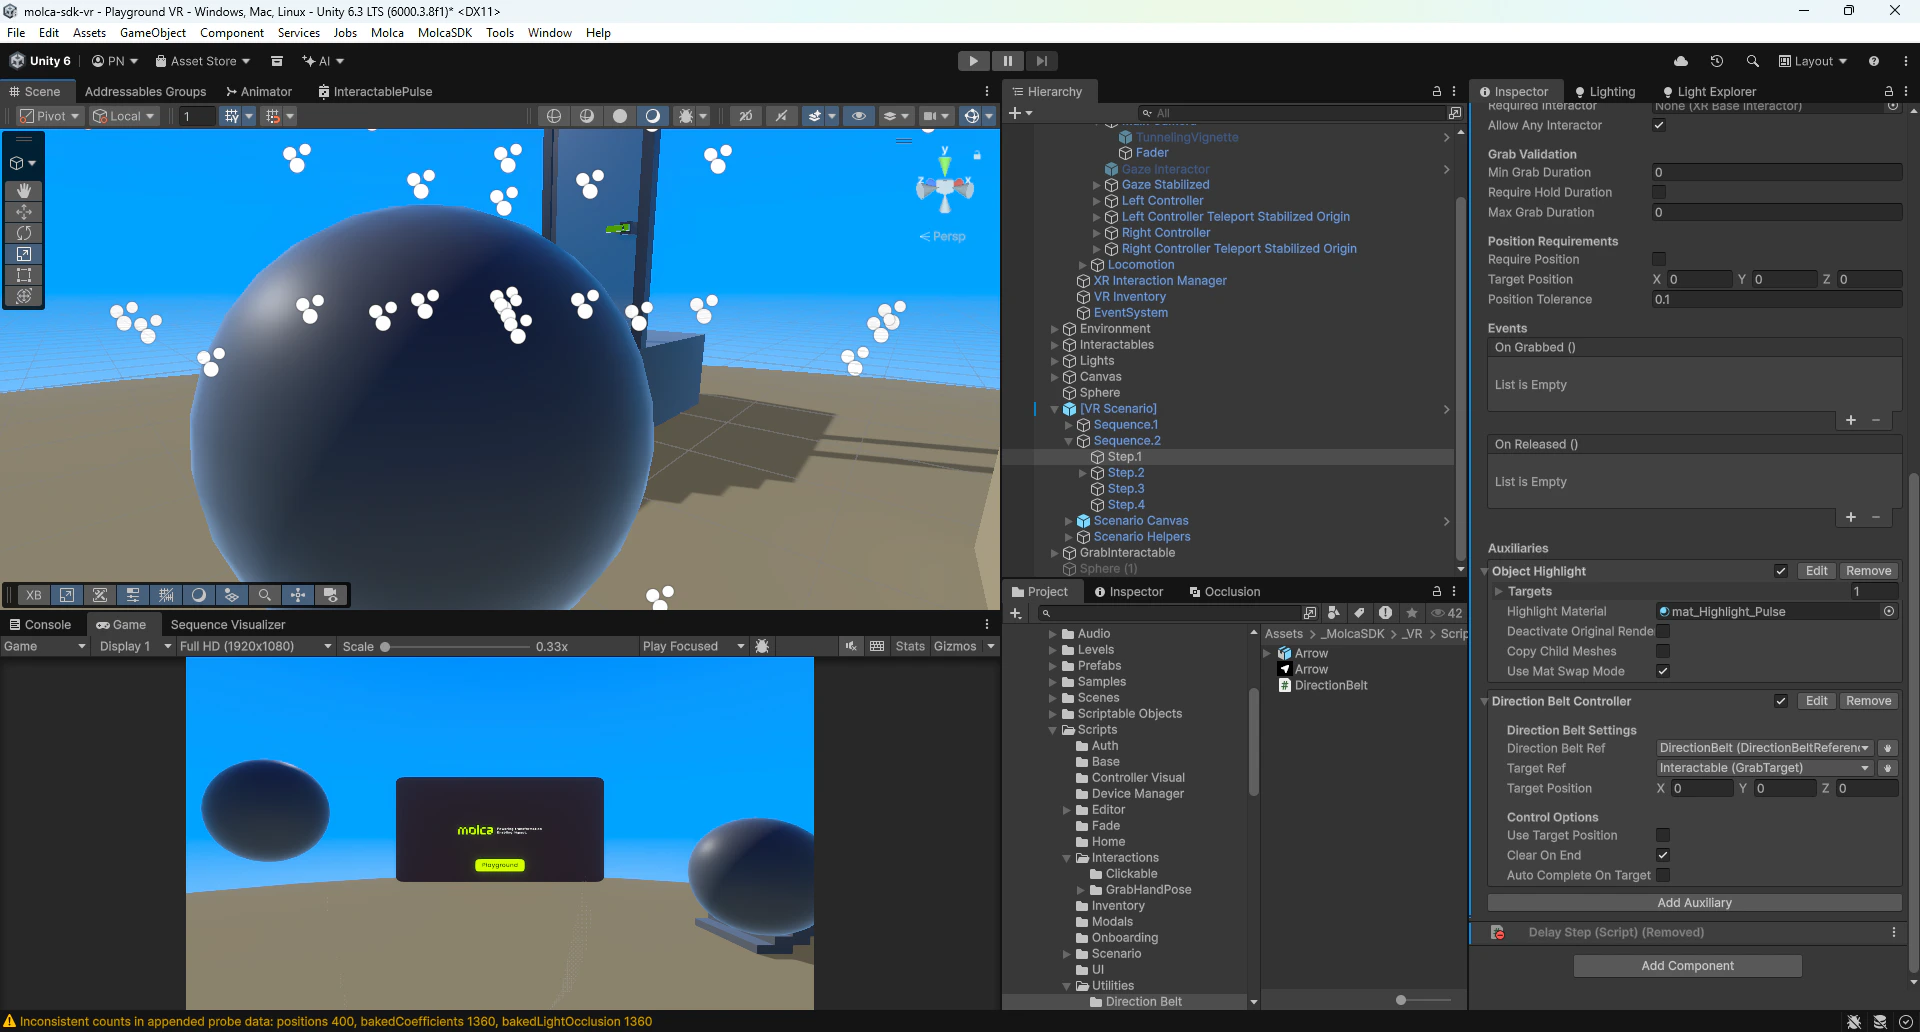
Complete Grab Object Scene Setup
Interaction Flow Animation
Animated sequence showing trainee approaching object (belt guides), highlighting shows, hand grabs, holds, releases with feedback fading.
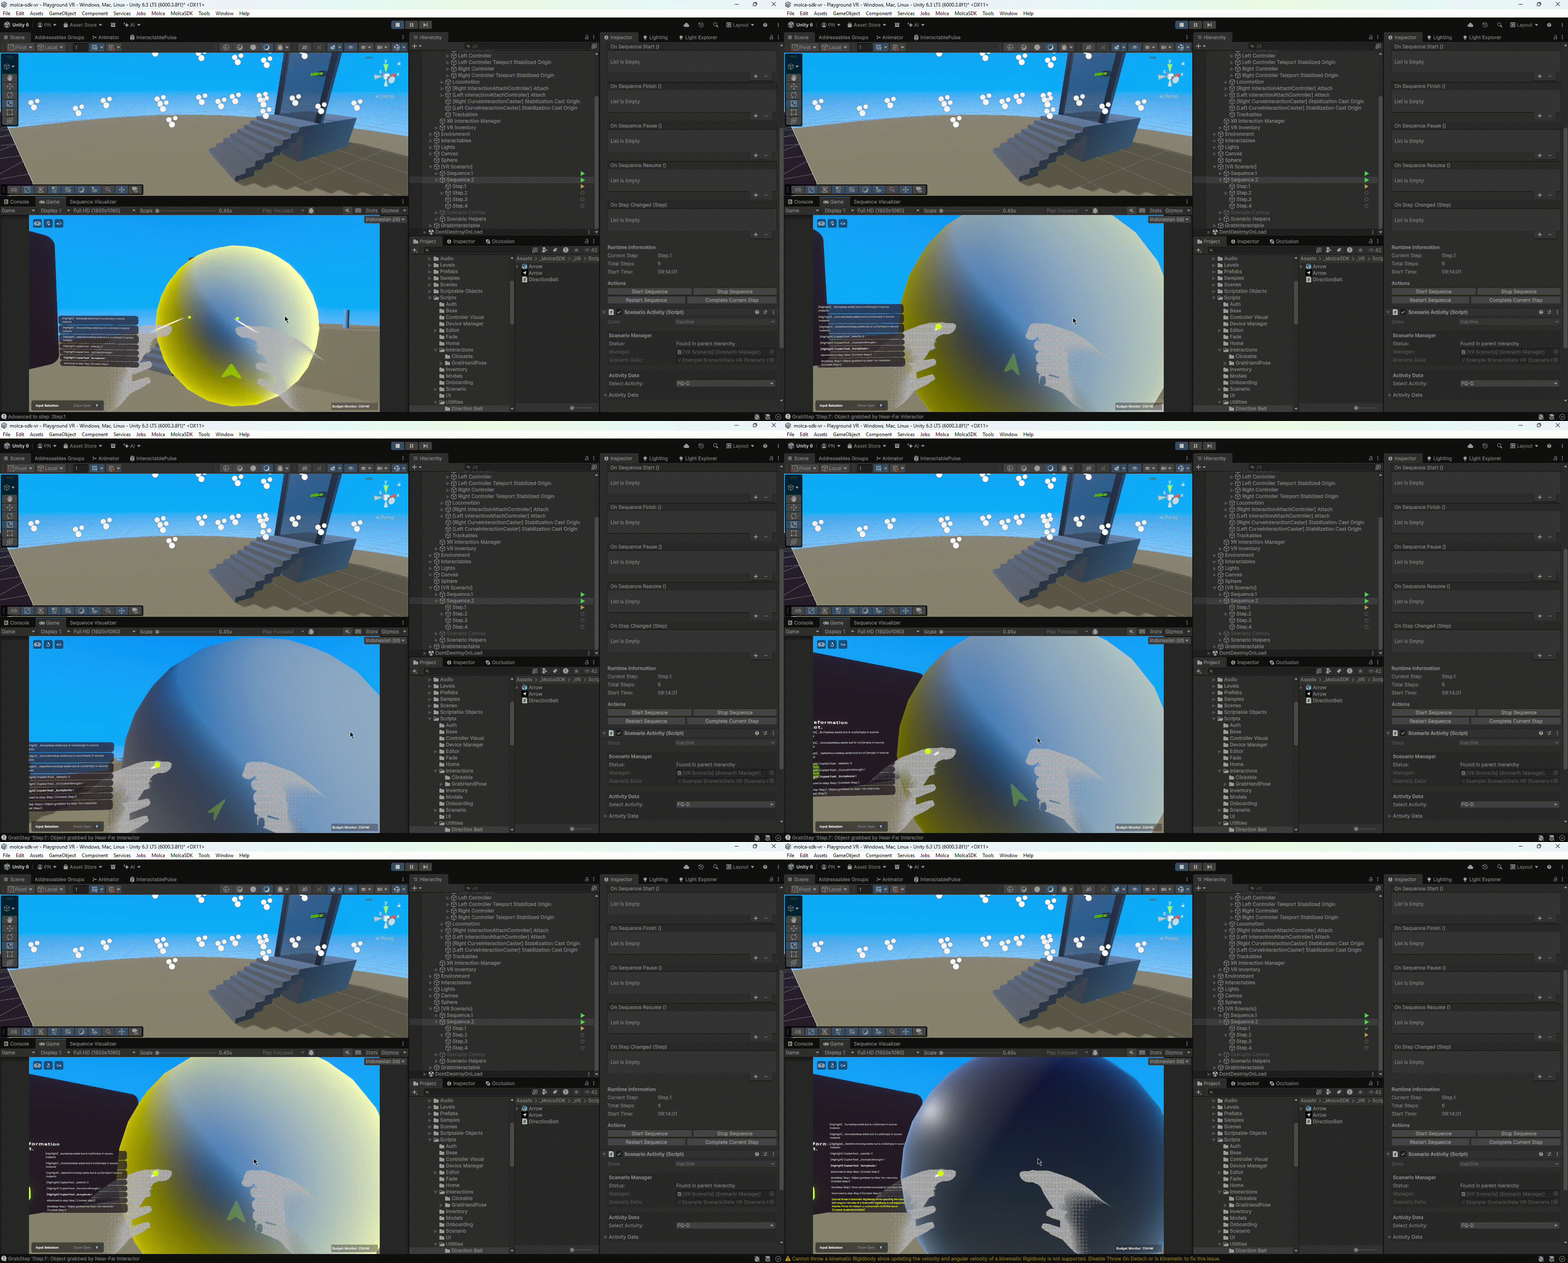
Grab Interaction Sequence (Animation)