> ## Documentation Index
> Fetch the complete documentation index at: https://docs-unity.molca.id/llms.txt
> Use this file to discover all available pages before exploring further.
# New scenario quick start
> Manual checklist from SimulationScenarioData (or TourScenarioData) through scene wiring to ScenarioDataConfig and testing.
**Product:** [Molca VR SDK](/overview/platforms) (**molca-sdk-vr**). DT apps do not use this flow.
This page is a **linear checklist** for a new **simulation** scenario. Tour scenarios follow the same **data → scene → registry** pattern; see the [Tour](#tour-variant-short-path) section and [Tour subsystem](/vr/tour/tour-subsystem).
```mermaid theme={null}
flowchart LR
D[Scenario data asset] --> S[Unity scene + prefab]
S --> M[ScenarioManager + activities + steps]
M --> R[ScenarioDataConfig collection]
R --> H[Home UI]
```
## Prerequisites
* Scenario scene is in **File → Build Settings** (and/or Addressables, if you load by reference).
* [RuntimeManager](/core/runtime-manager) prefab variant matches your needs (offline vs [session](/vr/session-loading-and-events), [tour](/vr/tour/tour-subsystem) if applicable).
* [Scenario Data Config](/setup/scenario-data-config) exists on [Global Settings](/setup/global-settings).
***
## 1. Create simulation scenario data
1. **Project** window → **Create → MolcaSDK → Scenario → Simulation Scenario Data** (or equivalent menu for `SimulationScenarioData`).
2. Name the asset (e.g. `Scenario_MyTraining`).
3. In the Inspector, set:
* **Ref Id** — stable id (auto-generated if empty).
* **Scenario name / description / tags / image** — Home UI and metadata (`DynamicLocalization` entries are initialized from `RefId` in `BaseScenarioData.Initialize()`).
* **Time limit** — `Time Limit Seconds`; `0` = no limit.
4. **Scenario Activities** — add **`ScenarioActivityData`** entries (each has **Ref Id**, titles, **Activity Id** / slug fields as defined on the type). These are the **authoring records** the runtime [ScenarioActivity](/vr/scenario-activity) will match.
5. **Scene loading** — configure the **`SceneLoadPlan`** for your scenario:
* **Single Player Plan** — expand **`Single Player Plan`** in the Inspector:
* **Scenario Scene** — the main scenario logic scene (required). Set either **`Scene Name`** (build settings) or **`Scene Reference`** (Addressable — takes priority).
* **Preload Scenes** — optional scenes loaded before the scenario scene (e.g., shared environment). Index 0 loads as Single (active scene); subsequent entries load Additive. Each entry can specify **`Wait For Ref Ids`** to pause loading until those RefIds are registered in `ReferenceManager`.
* **Role Scene Mappings** — for multiplayer scenarios, configure per-role scene plans. Each mapping has a **`Role Id`** (matching a `ScenarioRole.RefId`) and its own **`SceneLoadPlan`**.
**Load order:** When preloads exist, `preloadScenes[0]` loads as Single, subsequent preloads as Additive (waiting for RefIds between each), then `scenarioScene` as Additive. When no preloads, `scenarioScene` loads as Single.
Confirm the **scene names or Addressable keys** match your Unity scenes exactly.
***
## 2. Create and lay out the scenario scene
1. Create or open the **Unity scene** referenced by the scenario asset.
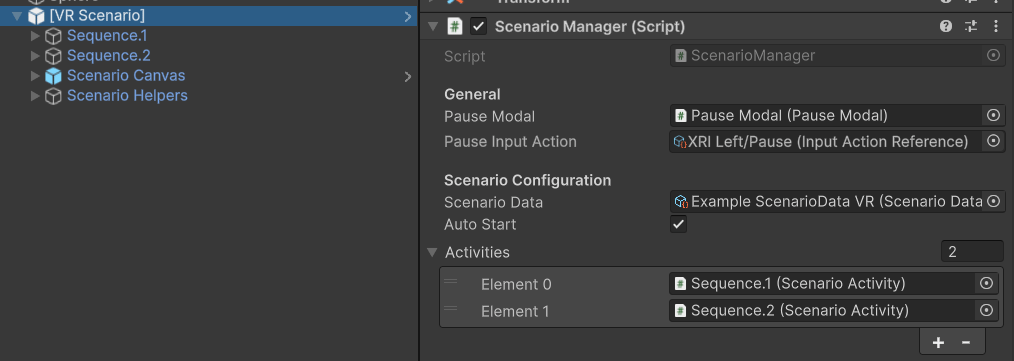
2. Add the **`[VR Scenario]`** prefab (typical path: `Assets/_MolcaSDK/_VR/Prefabs/Base/`) — includes XR rig, scenario UI shell, and related objects (your project layout may vary).
3. Select **`ScenarioManager`** on the prefab (or your scene root).
### ScenarioManager (in scene)
| Field | Action |
| ------------------------------------------------- | --------------------------------------------------------------------- |
| **Scenario Data** | Assign your **`SimulationScenarioData`** asset. |
| **Auto Start** | Enable for immediate start on load; disable if you start from script. |
| **Activities** | Assign in step 3 (ordered list of **`ScenarioActivity`** components). |
| **Start All Activities Simultaneously** | Parallel vs first-only sequential behavior. |
| **Is Direct Complete When All Activity Complete** | Auto-finish scenario when every activity completes. |
| **Use Session Manager** | Enable for connected [session](/vr/session-loading-and-events) flows. |
| **Pause Modal** / **Pause Input** | Wire pause UX. |
See [Scenario manager](/vr/scenario-manager) for state and timing notes.
***
## 3. Create activities in the scene
For **each** `ScenarioActivityData` on the asset:
1. Create a GameObject (e.g. under an `Activities` parent).
2. Add **`ScenarioActivity`** — Unity adds **`SequenceController`** automatically (`[RequireComponent]`).
3. Set **`Activity Id`** on **`ScenarioActivity`** to the **same string as** that row’s **`ScenarioActivityData.RefId`**. At runtime, the component resolves **`ActivityData`** with `FirstOrDefault(a => a.RefId == activityId)`; a mismatch logs a warning and breaks Home/session metadata binding.
4. Configure **`autoAdvanceToNext`** if you want automatic progression to the next activity when the sequence completes.
5. Drag each activity GameObject into **`ScenarioManager.Activities`** in the **intended order** (unless you rely entirely on simultaneous start — then order still matters for UI/progression).
***
## 4. Add steps under each activity
1. Under each activity object, add child GameObjects and attach **Step** components ([Grab](/vr/steps/grab-step), [Valve](/vr/steps/valve-step), etc.).
2. **`SequenceController`** discovers **Step** children and runs them in hierarchy order; use [ParallelStep](/core/core-step-types) or bridges when you need non-linear flow.
3. Wire **SceneObjectReference** / interactables: put [**ReferenceableComponent**](/core/reference-system) on targets and point steps at those **Ref Ids**.
4. Optional: **Auxiliaries** on each step ([scoring](/vr/scoring/step-scoring-auxiliary), haptics, controller hints — [VR step auxiliaries](/vr/steps/vr-step-auxiliaries)).
Use [Sequence Visualizer](/core/sequence-visualizer) in the Unity Editor to inspect the tree, **change step type**, or open the [CSV Step Importer](/core/csv-step-importer).
***
## 5. Scoring (optional)
1. **`ScenarioScoring`** on the `ScenarioManager` object (or as your prefab dictates).
2. **`ActivityScoring`** per **`ScenarioActivity`**.
3. **`StepScoringAuxiliary`** on steps that contribute points.
Details: [ScoringConfig](/vr/scoring/scoring-config) and related pages.
***
## 6. Register in ScenarioDataConfig
1. Open the **`ScenarioDataConfig`** [SettingModule](/setup/global-settings).
2. Under **Scenario Collections**, add or extend a collection.
3. Add your **`SimulationScenarioData`** asset to the list so [Home UI](/vr/home-ui) can list it (and so org/content flows can resolve it when connected).
***
## 7. Test
| Goal | Suggestion |
| -------------- | -------------------------------------------------------------------------------------------------------------------------------------------------- |
| Fast iteration | Disable **Use Session Manager** on `ScenarioManager`, enter Play Mode from the scenario scene with **Auto Start** on. |
| Full flow | Run **Preload → Auth → Home**, pick the scenario, and confirm [session loading](/vr/session-loading-and-events) + scene name / Addressables match. |
***
## Scene loading details
### SceneLoadPlan structure
The **`SceneLoadPlan`** supports ordered multi-scene loading with synchronization:
| Field | Purpose |
| ------------------ | ------------------------------------------------------------------------------------------------------------------------------------------------------------------------ |
| **Preload Scenes** | Array of scenes loaded before the scenario scene (e.g., shared environment, lighting). Index 0 loads as **Single** (active scene); subsequent entries load **Additive**. |
| **Scenario Scene** | The main scenario logic scene. Loads **Additive** when preloads exist, **Single** when no preloads. |
### SceneEntry fields
Each scene entry (preload or scenario) has:
| Field | Purpose |
| -------------------- | ---------------------------------------------------------------------------------------------------------------------------------------------------- |
| **Scene Name** | Build-settings scene name. Used when **Scene Reference** is not set. |
| **Scene Reference** | Addressable `AssetReference`. **Takes priority** over Scene Name when valid. |
| **Wait For Ref Ids** | Array of RefIds that must be registered in `ReferenceManager` before the next scene loads. Leave empty to wait two frames only. Timeout: 15 seconds. |
### Load order example
**Configuration:**
```
singlePlayerPlan:
preloadScenes:
[0] sceneName: "Environment_Factory"
waitForRefIds: ["factory_floor", "control_panel"]
[1] sceneName: "Lighting_Day"
waitForRefIds: []
scenarioScene:
sceneName: "Scenario_SafetyTraining"
```
**Execution:**
1. Load "Environment\_Factory" as **Single** (active scene)
2. Wait for "factory\_floor" and "control\_panel" RefIds (or 15s timeout)
3. Load "Lighting\_Day" as **Additive**
4. Wait two frames (no RefIds specified)
5. Load "Scenario\_SafetyTraining" as **Additive**
### Multiplayer role scenes
For multiplayer scenarios, configure **`roleSceneMappings`**:
```
roleSceneMappings:
[0] roleId: "operator"
plan:
preloadScenes: [shared environment]
scenarioScene: "Operator_View"
[1] roleId: "supervisor"
plan:
preloadScenes: [shared environment]
scenarioScene: "Supervisor_View"
```
At runtime, `ScenarioData.GetSceneLoadPlan(playerMode, roleId)` returns the appropriate plan. The **`SceneLoadPlanExecutor`** (used by `ScenarioSessionManager`) handles the ordered loading and RefId synchronization.
***
## Tour variant (short path)
1. Create **`TourScenarioData`** (**Create → MolcaSDK → Scenario → Tour Scenario Data**).
2. Fill metadata, **spots**, **materials**, and **scene** reference like the simulation asset.
3. Open the tour scene; use **`[VR Tour]`** from `Assets/_MolcaSDK/_VR/Prefabs/Tour/` **or** `[VR Scenario]` with **`TourScenarioData`** assigned — [mode driver](/vr/scenario-mode-drivers) selects tour behavior.
4. Place **`TourAreaManager`**, **`TourSpotController`**, etc., per your content ([Tour area and spots](/vr/tour/tour-area-and-spots)).
5. Runtime prefab must include **`TourSubsystem`** when using tour + session flows.
6. Register the asset in **ScenarioDataConfig** as above.
***
## Unity Editor